Go Cardless - Creating and Managing Direct Debit Mandates
 This article is part of the Go Cardless section.
Find all related articles here:
General
The Bank Details in the lower part of the Direct Debit screen are irrelevant if you’re using a Go Cardless direct debit, as the bank details are not stored in CPL. Even if you enter bank details (account number, sort code), they will automatically change to zeros.
 Set the description used for direct debit payments made from Go Cardless in the system option "Go Cardless Direct Debit Payment Description". Contact Support to set this up.
Creating a DD Mandate
First Steps
- Load the client account in question.
- On the Account tab set the Payment Type to Direct Debit.
- Select the Direct Debits tab.
- Highlight the relevant Direct Debit profile.
- Select Amend, or double-click the line to open it.
- Enter a Profile Name (e.g. GoCardless Mandate or GoCardless Collection).
- If multiple direct debits are enabled, and you're not editing the default profile, choose a DD Account Type.
If the "Use Go Cardless" and "Allow Multiple Direct Debits" system options are turned on, multiple direct debits can be collected from a single mandate via Go Cardless, such as Proposed Works and Float.When adding additional direct debit profiles, simply select the relevant type from the DD Account Type drop-down.
Contact Support if you'd like to add options to this list:
- Select Calculate Direct Debit.
The Calculate Direct Debit button only works on the default Direct Debit profile and will be inactive on all others.
If the system setting "Use Minimum Balance To Allow User To Set Up Direct Debit" is turned on, you can define the balance limit in the setting "Minimum Balance To Allow User To Set Up Direct Debit".
This means a Direct Debit mandate can only be created if the client’s balance is at or below the value set, both in the system (using the Calculate Direct Debit button) and via the portal. Users can still manually configure a Direct Debit in the system if needed.
Contact Support to configure these settings.
- A warning is displayed: This will calculate the total outstanding for the client and add appropriate payment values to this default direct debit. All other direct debits should be deleted. Click OK.
- The Calculate Direct Debit window will pop-up. Select a Payment Frequency from the drop-down list. Learn about the direct debit calculation here.
- Review the calculation presented on the screen. Click Accept Direct Debit:
Next Steps
At this point, you have two options:
- Email a link to your client so they can complete setting up the direct debit.
- Finalise the setup yourself over the phone with your client.
Option 1 - Email Link to Client
- Click Email DD Signup Link.
- The client's default email address will pop up. Change this if you want to use a different email address for the direct debit. Click Finish.
- Enter the amount. You can add two decimals if needed. Click Finish.
- Click OK in the Email Sent pop-up window.
- Click Save:
- The client will receive an email with a customised link to follow through. They need to complete their payment details and click Set up this Direct Debit.
- The email will be sent using the email property GC Instant Bank Payment Link and will be be saved on the Documents tab of the client account.
The sign-up link expires in 7 days.

The sign-up link will not display the amount so you might want to communicate it to your client. However, the client will receive an email from GoCardless before the direct debit is collected. This email does specify the amount.
If you've sent a direct debit signup link but the client hasn't completed the setup yet, you might want to change their payment type back to Normal until they do. This ensures they're included in the Client Notices process. Check out the Reports section here to learn more about viewing clients' Go Cardless statuses.Once the client has set up the Direct Debit, you will see it in your Go Cardless Portal under Customers, with an Active status.
Option 2 - Finalise Setup on the Phone
- Tick the Paperless box. A pop-up window will advise of the direct debit telephone message to read out to your customers. Select OK:
If the system option "On Paperless Checked Require Memo" is enabled, the user must enter a memo for the client account when the Paperless checkbox is selected.
- At the same time, another pop-up will ask you to confirm whether the client should be marked as due to be sent a Direct Debit introductory letter:
- If you select Yes to the question "Set Due Introductory Letter?", the client will be included when you run a mail merge using the Due Introductory Paperless DD Letter filter.
- This setting can be manually ticked or unticked later if you need to make changes:
- Enter the requested client information in the Phone Authorisation Details screen (e.g. email, name, address, bank details). Click Submit.
- The message will be displayed: Your client details have been set up with GoCardless. You can begin making payments against their account now. Click OK.
- Click Save:
- You will now see the client in your Go Cardless Portal under Customers, with an Active status.
After the mandate has been validated by Go Cardless, the DD Setup Status in the pin panel of the client account will change to Active.
In the system option "DD Paperless Telephone Message" you can provide wording for a direct debit script. This wording will appear on screen when you tick the Paperless option, helping you guide clients through the process of agreeing to the Direct Debit. Contact Support to set this up.
If the "DD Paperless Telephone Message Is Script" system option is turned on, the Phone Authorisation Details screen will appear at the same time as the telephone message. Otherwise it will appear after you click OK on the transcript. Contact Support to set this up.

In case of a failed direct debit collection, you can attempt to take it again by moving the collection date forward (or contact the client directly to discuss).
Updating Direct Debit Amounts
You can update GoCardless Direct Debit amounts from inside Client Global.
- Navigate to the Clients tab.
- Click the Global button to open Client Global Actions.
- Select the Direct Debits/Standing Orders tab.
- The Type is automatically set to Yearly Direct Debit Update and this cannot be changed.
- Select your date range, One Off Payment Date and the Developments you want to update the Direct Debit for.
- When you click Process, the system will review the invoices from the period selected and update the EAE accordingly.
- The new Direct Debit amount will be calculated based on the updated EAE.
Cancelling a DD Mandate
To cancel a mandate, click Cancel DD Mandate:
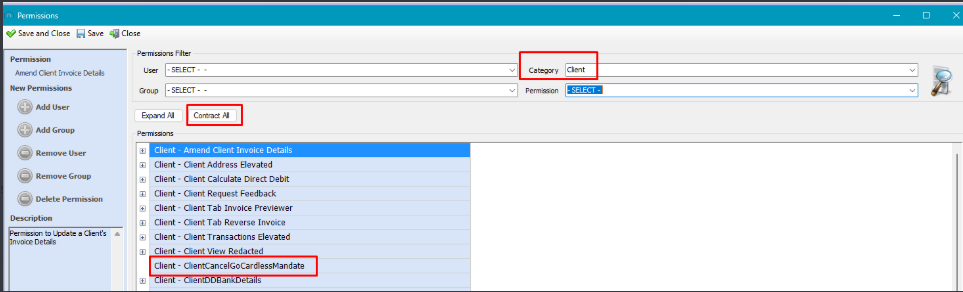
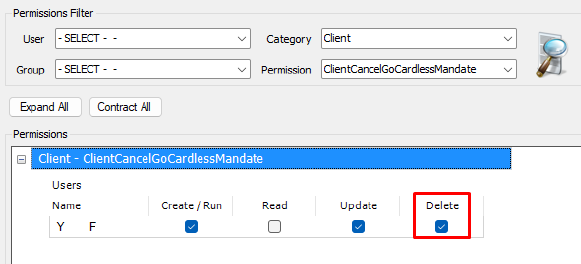
Users must have the Delete option selected within the "Client Cancel Go Cardless Mandate" permission to view the Cancel DD Mandate button:
Related Articles
Go Cardless - Direct Debit Calculation
This article is part of the Go Cardless section. Find all related articles here: Go Cardless When creating a direct debit mandate and clicking the Calculate Direct Debit button described here, a window will pop up where you need to select a Payment ...Go Cardless - Creating Direct Debits and Making Payments in the Web Portal
This article is part of the Go Cardless section. Find all related articles here: Go Cardless If the Go Cardless integration is activated, your clients can make payments by bank transfer and set up direct debits in the Web Portal. Make a Payment Click ...Go Cardless - Introduction and Reporting
This article is part of the Go Cardless section. Find all related articles here: Go Cardless Introduction The integration between the system and Go Cardless simplifies receiving payments by enabling instant bank transfers and direct debit payments ...Go Cardless - Creating Instant Bank Payments
This article is part of the Go Cardless section. Find all related articles here: Go Cardless To create an instant bank payment for a client, please follow the below steps: Load the client account in question. Select the Direct Debits tab. Select the ...Go Cardless - Creating One-Off Payments
This article is part of the Go Cardless section. Find all related articles here: Go Cardless Follow these steps to create a one-off payment on the default direct debit profile: Load the client account in question. Select the Direct Debits tab. ...