Purchase Ledger Transactions - Posting a Purchase Invoice

This article is part of the Purchase Ledger section.
Find all related articles here:
Introduction
This guide explains how to post an invoice from a Purchase Ledger (PL) Account into the Hold File.
You can post:
- An invoice not linked to an existing job.
- An invoice linked to an existing job.
Most of the steps are the same for both. The key difference is that if the invoice relates to a job, some details will be pulled through automatically when you enter the job’s order number.
If you are using the In-Tray to post PL invoices along with a scanned copy of the invoice file, please refer to this guide.
Accessing the Purchase Ledger Transactions Screen
To begin:
- Go to the Purchase Ledger tab.
- Click Transactions in the Action Panel:
- This will open the Purchase Ledger Transactions screen:
Choosing the Posting Type
Choose one of the following posting types from the drop-down list:
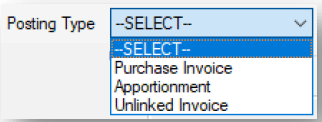
Purchase Invoice
- Used when you have received an invoice from a contractor with a PL Account in the system. This allows you to charge the cost to a development and arrange payment to the supplier.
Apportionment
- Used when there is no contractor invoice but you want to apply charges to clients via the nominal ledger rather than a PL Account.
- For example, this might be used for a migrated balance — where the client has already been billed in another system, and you are transferring that balance into the system.

The PL Account drop-down only appears for the Apportionment posting type when the system option "Link Apportion to PL" is enabled.
A Journal code must be set up and mapped to a nominal code in System > System Parameters > Journal Types, as you will need to select it when posting.
Unlinked Invoice
- Used when you want to record an invoice in the system but not charge it to any clients. The invoice is entered against a PL Account but is posted directly to the nominal ledger for the development.
- You might use this for costs like bank charges or bank interest that are not passed on to clients.
Posting an Invoice
Posting an Invoice Not Linked to a Job
If the invoice is not related to a job in the system:
- Leave the Order Number field blank.
- Manually enter all invoice details, as explained in the Entering Invoice Details section of this article.
Posting an Invoice Linked to a Job
If the invoice relates to an existing job:
- Before completing any other detail, enter the order number from the job in the Order Number field:
- If the contractor hasn't included the order number on their invoice, you can find it in the job - either in the main Jobs Maintenance tab or in the Jobs tab within the relevant development.
- Press Tab on your keyboard.
- If the job is still open, you will be asked if you want to mark it as completed — click Yes, then OK:
- The system will then ask if you want to pull through the amount and description from the job — click Yes if you want to do so:
- Review this and any other information brought through and update them as needed:
- Proceed to fill in the rest of the information in this screen, as explained in the Entering Invoice Details section.
Even if you pull details from the job, you must still check all fields carefully, especially the Description, as this is what will appear on the client’s invoice.
Entering Invoice Details
For all invoices, complete the following fields:
- Cash Book Reference — For internal use only.
- PL Account — Select the contractor or supplier from the drop-down list, or search for a contractor’s name by clicking the button with two dots next to the field:
- If there are any Memos attached to the PL account, a pop-up will appear - click Yes to view them.
- Even if you click No, you can click on the yellow paper icon to view Memos at any time:
- Date of Invoice — The date shown on the contractor’s invoice.
- Invoice Due — Populated automatically based on the Grace Days set on the PL Account.
- If none are set, it defaults to the invoice date.
- Controls when the invoice will appear in the PL Payments screen.
- Editable if required.
- Transaction Date — Defaults to today’s date.
- Used for nominal transaction dates.
- Used as a filter on many user reports.
- Editable if required.
The "Auto Set Transaction Date Invoice Date" System Setting can be switched on which will automatically set the Transaction Date to the Invoice Date.
- Invoice Number — The invoice reference from the contractor.
- Order number — Leave blank if not related to a job.
- Total — The total amount payable (including VAT).
- VAT Rate — Defaults to the VAT rate set on the PL Account but can be changed.
The system will calculate the Goods and VAT amounts automatically.
- Description — Enter a clear description of the charge for the client invoice.
- Press F5 to select from standard descriptions if set up.
- Internal Comments — Optional notes.
Purchase Invoice Posting Details
Entering Charge Details
In the Purchase Invoice Posting Details section, you will enter the details of who will be billed for the charge:
- Choose the relevant Charge Type. This controls how the charge will appear on client invoices and in reports.
Selecting the correct Charge Type whilst the "Allocate Invoice Credits to Same Charge Type" System Setting is enabled will also ensure that any credits are applied to outstanding debit charges of the same type. This setting can be disabled to allow credits to be posted to the oldest debt first instead.
If the charge is ad hoc or a one-off (i.e. not a recurring charge), you may want to choose a type that is excluded from estimated annual calculations. To have a charge type excluded, contact Support.
- Enter the Repair Date — the date the work was carried out.
- If the invoice is for a supply or regular service (such as electricity), you might want to use the first day of the period it covers.

It is essential that the Repair Date is correct, as it controls which invoice period the charge appears in.
- If applicable, enter an Invoice Period (From and To dates) - useful for regular supply invoices like electricity bills.
The Invoice Period controls whether the charge should transfer from the seller to the buyer during a property sale.
In the grid:
- Select the relevant development in the Development field.
- This may be populated automatically if the invoice relates to a job.
- If charging a specific client, select the Client from the drop-down list.
- If charging multiple clients, select an Apportionment instead.
If the system option "Allow Dummy Hold File Posting" is turned on, the system will let you post an invoice without an apportionment or client. This can be useful if you know which development the work relates to but aren’t yet sure who is liable to pay for it. The invoice can be posted to the Hold File, but it can’t be processed any further until an apportionment or a client is added to the entry.
Contact Support if you would like this option enabled.
Contact Support if you would like this option enabled.
The invoice can be posted to the Hold File, but it can’t be processed any further until an apportionment or a client is added to the entry.
- For budgeted developments, select a Budget Heading if applicable.
- Enter the Total amount for this line.
- Press Tab — the system will calculate the Goods and VAT for you.
- If the invoice covers multiple developments or clients, add extra rows in the grid and repeat these steps.
- When you start filling in a row, a new one appears automatically — leave it empty if not required.
- To remove a row, tick the box on the right of the row and click the Remove Selected icon:
The totals at the bottom of the screen update automatically as you go along.
- Make sure that Grand Total, Total Goods and Total VAT at the bottom of the grid match the totals entered at the top of the screen.
- The system will not allow the invoice to be posted if these do not match.
Post To - Where to Post the Invoice
Once you’ve entered all details, choose where to post the invoice in the Post To drop-down:
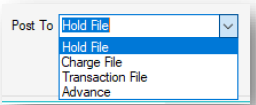
In most cases, you should select the Hold File. This allows you to review and amend the invoice before it is applied to client accounts.
Other options include:
- Charge File — Posts charges straight to clients' Charge Files.
- Transaction File — Posts charges directly to clients' Transaction Files.
- Advance — Depending on system settings, you may have an option called Advance.
- This is not often used and is intended for provisional entries—similar to an estimate — which will later be reversed and replaced with final invoice details and an invoice attachment.
Contact Support if you want to use the Advance option, as it may require additional configuration/training.
Post Type
Choose when the charge should appear on client invoices:
- Next Invoice Run — The charge will be picked up in the next invoice run.
- Immediate — The charge will be flagged as Immediate.
- You can choose to process these separately when running the Hold File.
Printing a QR Code Label (Optional)
If your company uses QR codes for document management, tick Print PL QR to print a label for the invoice.
When you tick the box, a field appears where you can select how many labels to print. Use the arrows to increase or decrease the number:
The QR code will be generated after posting:
If you don’t use this option, it can be disabled in your user settings by ticking Don’t Print QR Codes.
Final Checks and Posting
When you’re ready with all the details, click the Post icon:

If the system detects that the apportionments don’t total 100%, a warning will appear. This may happen due to rounding differences when splitting charges between clients:
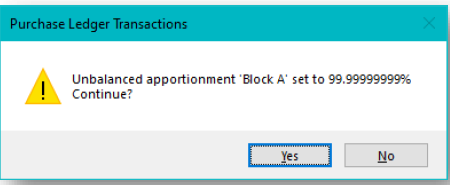
- Click Yes to continue posting anyway, or No to go back and adjust them manually.
If the system option "Prevent PL Posting For Unbalanced Apportions" is enabled, you won’t be able to continue posting until the figures are adjusted.
For assistance with enabling or adjusting this setting, contact Support.
Once posted, a confirmation message will appear showing the number of records updated, along with the Day Book Number and Batch Number. Clicking OK returns you to the Purchase Ledger Transactions screen, ready for further postings:
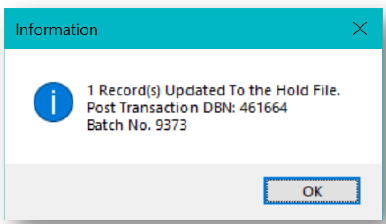
If you post several invoices in the same session — that is, without closing and reopening the Purchase Ledger Transactions window — they will all have the same batch number.
At the top of the window are the Session Start and Session Post Balance fields. Session Start defaults to 0.00, and each invoice posted in the same session adds to the Session Post Balance.
The Recent Invoices button at the bottom of the window displays all invoices added or updated by the current user — that is, you — for any contractor:
Related Articles
Purchase Ledger - Reviewing Invoices and Payments in the Transaction Activity tab
This article is part of the Purchase Ledger section. Find all related articles here: Purchase Ledger Once you have posted an invoice for a PL account following the steps in Purchase Ledger Transactions - Posting a Purchase Invoice you will be able to ...Fixing Errors - Contra-posting to correct an 'Allocated' Hold File entry
This article is part of the Fixing Errors section. Find all related articles here: Fixing Errors Introduction You will need to follow a different process if you have posted to the Hold File with an incorrect amount, but your charge has since been ...Fixing Errors - Contra-posting to correct a 'Normal' Hold File entry
This article is part of the Fixing Errors section. Find all related articles here: Fixing Errors Introduction You can’t amend the amount on Hold File entries, so if you have posted with an incorrect amount you will need to contra-post to correct. ...Purchase Ledger Invoices Import
This article is part of the Imports section. Find all related articles here: Imports This guide walks you through using the PL Invoices Import tool to upload purchase ledger invoices for your PL accounts. Getting Started If your import has been ...Purchase Ledger Payments
This article is part of the Purchase Ledger section. Find all related articles here: Purchase Ledger Introduction After you've received and entered an invoice for works or goods into the system, you can proceed with paying your PL accounts for these ...