Properties - Processing a Sale

This article is part of the Property Sales section.
Find all related articles here:

The system option "Allow Sales on CTF Development" controls whether property sales are allowed on developments that you no longer factor. Please contact Support if you would like this setting adjusted.

If you plan to apply admin fees when processing a property sale, you'll need to set up Apportionment Fees first, as explained in this article.
Locating the Sale Button
When you're notified of a property sale - typically by a solicitor - you’ll begin by:
- Clicking the Clients tab.
- Selecting the client account from the grid.
- Clicking the Sale button in the action bar at the bottom:
This opens the Sale for Client xxxxxxx screen:
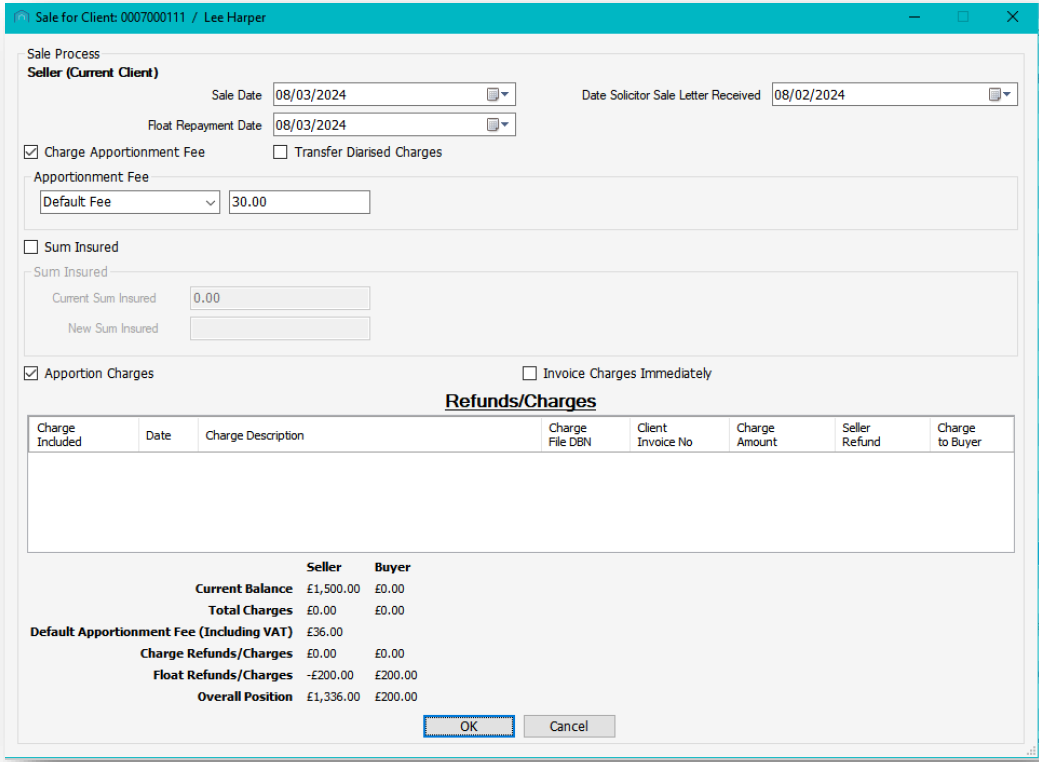
Adding Sales Information: Sale Date, Float Repayment Date, Apportionment Fees and More
In the system, the Sale Date you select will be used as both the buyer’s entry date and the seller’s exit date. However, charges will be allocated as follows:
- The seller is responsible for all charges up to the end of the day before the Sale Date.
- The buyer is responsible for charges from the Sale Date onward.
- Select the Sale Date.
- By default, both the Sale Date and the Float Repayment Date are set to the current day. Change them as needed.
- Choose the Date Solicitor Sale Letter Received.
The system option "Use Solicitor Sale Letter Date" controls whether the Date Solicitor Sale Letter Received field is displayed. This option is off by default.
When enabled, the date is used to calculate the sale fee based on the difference between the sale date and the solicitor letter date.
Please contact Support if you would like this option enabled.
- If apportionment fees have been set up, the default fee will automatically appear in the Apportionment Fee drop-down.
- If any Apportionment Fees have Late Days configured, the system will automatically apply the appropriate fee based on the selected dates.
- If this occurs, a message will appear to let you know: "The sale notification from the solicitor was late, so a non-default fee has been automatically selected."
The system option "Sale Fee Nominal Code" stores the nominal code used for the sale fee collected. Please contact Support to update this setting.
You can still select a different Apportionment Fee manually from the drop-down menu.
- The Float Repayment Date can be set to a future day, but it must be at least one day after the Sale Date.
- To return the float to the client’s balance, run the Float Repayment process as described in the Float Refunds for Sold Properties or Ceased Developments section of this article.
- To remove the fee altogether, untick the Charge Apportionment Fee box:
To remove this box from your system, the "Charge Apportionment Fee" system option can be disabled or configured to apply only to the Client account type, not Developer. Contact Support to arrange this setup.
- Choose whether to tick Transfer Diarised Charges:
- These are charges that apply specifically to the individual client.
- They’re different from Diarised Charges set at the development level, which the system will automatically split between the buyer and seller during processing.
- You can also tick Sum Insured to update the sum insured value for the property.
- This is useful when, for example, a property is moving from a developer to a buyer.
- Leave it unticked if no update is needed.
- The Apportion Charges option is ticked by default.
- This allows the system to pro-rate the relevant charges from the seller's account.
- In the Refunds/Charges grid, untick any items you don’t want to be pro-rated - they’ll remain with the seller:
PL Transactions posted directly to a client - rather than through an apportionment - aren’t pro-rated by default during a property sale. However, if "Allow Client Pro Rate" is enabled for a charge type, they will be. Contact Support to enable this setting for a specific charge type.
- Ticking Invoice Charges Immediately flags these charges to be separated when running an Amended Account.
- This is optional and not needed if you want to include all charges in a single invoice later:
- At the bottom of the screen, a table will show how the charges are split between the buyer and seller:
- Click OK to continue.
Adding New Client Details
- After clicking OK, a new screen appears for entering the buyer’s details.
- Fill in the information you have.
- Click Save in the top-left corner:
- A Sale Confirmation pop-up will ask you to confirm the sale. Click Yes to proceed.
- You’ll then see an Information pop-up confirming the charges have been split. Click OK to close it.
- A final pop-up confirms that the sale has been processed and offers to let you add the new client’s phone number. Click Yes or No as appropriate.
If you check the Charge Transaction tab for the new client, you’ll see the pro-rated charges applied to their account.
Check the exited client’s Charge Transaction tab to see matching opposite charges.
Related Articles
Properties - Pending Sales
This article is part of the Properties section. Find all related articles here: Properties Pending Sales was introduced as an interim process between starting a sale and completing a sale, to minimise the need for amendments or deletions after a sale ...Properties - Actions After a Sale
This article is part of the Property Sales section. Find all related articles here: Property Sales Invoicing the Seller/Buyer After completing the property sale process described here, you can: Generate an Amended Account for the new client right ...Managing Property Floats - Additional Options
This article is part of the Property Floats section. Find all related articles here: Property Floats The system provides tools to handle float refunds and transfers when a property is sold or a development ceases. Float Refunds for Sold Properties or ...Developments - Ceasing a Development or a Property
This article is part of the Developments section. Find all related articles here: Developments This article covers how to cease a development on the system if you no longer factor it, and actions you can take on a ceased development. Ceasing a ...Developments - Development Wizard - Adding Properties
This article is part of the Development Wizard section. Find all related articles here: Development Wizard Once you have created a new development and added blocks, you are ready to add properties and clients. To do this: You will already have the ...