In-Tray - In-Tray Outlook Add-In

This article is part of the In-Tray section.
Find all related articles here:
Setting up the In-Tray Outlook Add-In
If you have the In-Tray module, the In-Tray Outlook Add-In can be installed on each user's machine from the RPM_Distributions folder on your mapped drive.
Once installed, you can configure the default settings for the Add-In.
- Open Outlook. In the ribbon at the top you will see the RPM In Tray add in.
- Click Setup Link to In Tray to open the RPM Outlook In Tray Settings window.
- Select RPM from the Database dropdown.
- In the Default In-Tray dropdown, select your own username.
- There are 3 tick boxes which will determine how the Add-In transfers files to the In-Tray.
- Don’t Save Email Body With Invoice Attachments - Only save attachments on invoice emails. If unticked, the email body will also be saved.
- Don’t Save Email Body With Document Attachments - Only save attachments on document emails. If unticked, the email body will also be saved.
- Automatically Exclude All Attachments - Do not save any attachments.
- Click Save once you have completed the setup screen.
- If you want to change your settings, click Setup Link to In Tray again.
Using the In-Tray Outlook Add-In
Once setup is completed you can start sending documents from Outlook to the In-Tray.
Linking a document from Outlook to In-Tray
- Select an email from your inbox that has a document attached that you want to send to the In-Tray.
- While the email is selected, click Link to In Tray in the ribbon at the top of the screen.
Alternatively, right click on your email and select Link to In Tray from the options. - This will open the Link to In Tray window.
- Changing the Default In Tray will change the associated default In-Tray for the selected file. Any further emails from the same person will be linked to the chosen In-Tray.
- Click Change Link to change the user you want to receive the linked email. Only users that are setup for In-Tray will appear in the list.
- Click Attachments to choose which attachments to include when transferring the file to In-Tray.
- On the Change Attachment Selection screen, use the tick boxes to select which attachments to transfer.
- Excluded - Tick this to exclude the document for this email only.
- Correspondence - Tick if the document needs to go to the Correspondence tray in the In-Tray.
- Invoice - Tick if the document needs to go to the Invoices tray in the In-Tray.
- Ignored - Tick this to exclude the document for all future emails from this sender. This is useful if you want to exclude signature images.
- Once you have made your selections on the Change Attachment Selection screen, click Close.
- Click Link to send the file to the selected user's In-Tray.
- A pop-up will confirm that the file was successfully linked.
Multiple Account Matches Found
If the Add-In detects multiple Client or Purchase Ledger accounts associated with the selected email, the Linked To field will be highlighted red.
The Default user will be selected until you decide which one of the matched accounts to link the email to.
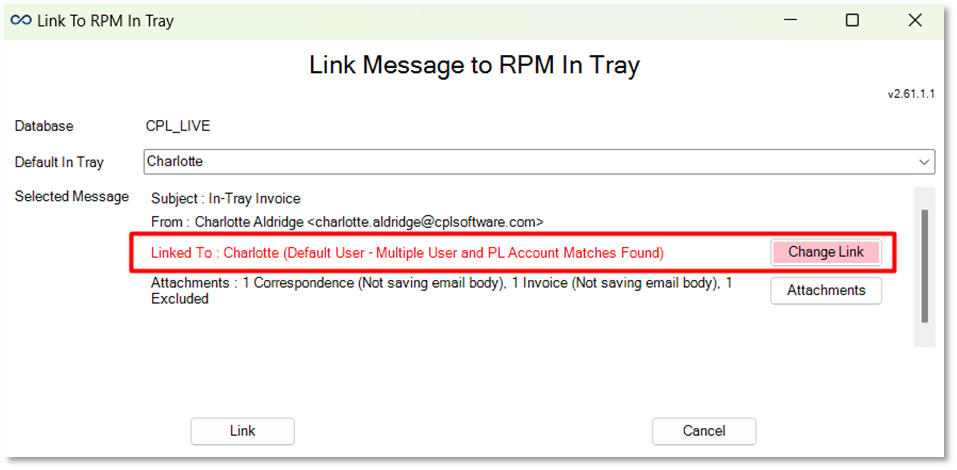
To do this:
- Click Change Link.
- On the Change In Tray Link screen you will see all accounts the email has been matched to.
- Use the dropdowns at the bottom to select which account you want to link to, and click the Link To... button underneath your selection.
You can choose from a matched account, or search for a different Purchase Ledger account or In-Tray user.
If you see a red X under your selection, this means you have not clicked the Link To... button.

- Click Advanced PM Search to search the system for the account in order to determine which user to link the file to.
Use the fields to search for the account, and the Property Manager field at the bottom will suggest a user. Click Accept to proceed. - Once you have changed the link, you can click Link to send the file to the selected user's In-Tray.
Related Articles
In-Tray - Reinstating the In-Tray Outlook Add-In
This article is part of the In-Tray section. Find all related articles here: In-Tray If you notice the Outlook Add-In is missing from the menu bar, Outlook may have disabled it. Reinstating an Inactive Add-In If you haven't used the Add-In for a ...In-Tray - In-Tray Exchange Service and Outlook In-Tray Integration
This article is part of the In-Tray section. Find all related articles here: In-Tray This article covers what the In-Tray Exchange Service does, and how it interacts with the Outlook In-Tray Add-in. The service runs on a Windows server, and is set up ...In-Tray - Adding and Managing Files in the In-Tray
This article is part of the In-Tray section. Find all related articles here: In-Tray To access the In-Tray: Select Tools from the top menu bar, then select In-Tray. This will open the Scanned Documents In-Tray window. Here you will find invoices and ...In-Tray - In-Tray Memos
This article is part of the In-Tray section. Find all related articles here: In-Tray You can use In-Tray Memos to manage follow-up actions and ensure greater visibility for your users. To add an In-Tray memo: Navigate to one of the following tabs: ...In-Tray - Linking and Posting in the In-Tray
This article is part of the In-Tray section. Find all related articles here: In-Tray Once you have added a document to the In-Tray, you are ready to link it to the relevant record. Linking Files Follow the steps in In-Tray - Adding and Managing Files ...