Property Portal - Admin: Users, User Groups and Permissions

This article is part of the Property Portal section.
Find all related articles here:
In the Admin menu > Users submenu, you can:
- create and manage users
- create and manage user groups
- assign and unassign permissions
Use the three options here: Users, User Groups, and Permissions:
Users
Select this submenu under Users to create and manage individual users.
Adding a User
- To add a user:
- Click Add New User:
- Fill in the details.
- Toggle Create a new Proptimo Core user on.
- Click Submit:
- Go to Proptimo Core.
- Load the newly created user in System > System Parameters > User Login.
- Double-click the username.
- The username will be the user’s first and last name combined without a space: for example, JaneSmith.
- Add a password and add permissions by moving relevant Available Groups to the Selected Groups box.
- Click Save and Close:
- The new user can now access the email they received when you created their account in the Property Portal.
- They must then follow the steps in this article, to sign and start using the Property Portal.

Ensure users are active in the Property Portal; deactivated users cannot complete the sign-up process.
- To import users:
- Click Import Core Users:
- This will automatically create Property Portal accounts for CPL users who haven't joined yet.
- Each user will receive an email with a temporary Property Portal password, which they’ll be asked to change.
- To resend email invitations to all CPL users that haven't signed up for the Property Portal yet, click Resend Invitations:
- To view inactive users:
- Toggle Include Inactive:
- To deactivate a user:
- Click the red power icon.
- The icon turns green.
- To reactivate the user, click the icon again.
- Ensure Include Inactive is toggled to view deactivated users.
Editing Profile Details
- To edit a user:
- Click the blue icon at the start of their row:
- The Profile Details section will appear at the top:
- To edit it, click the blue pencil icon:
- To save changes, click the green save icon below the section.
Editing a User's Permissions
- To add a permission:
- Select the category and permission under User Permissions.
- Toggle Granted on.
- Click Assign.
- To deactivate a permission:
- Select the category and permission under User Permissions.
- Toggle Granted off.
- Click Assign.
- To remove a permission:
- Click the red bin icon next to it.
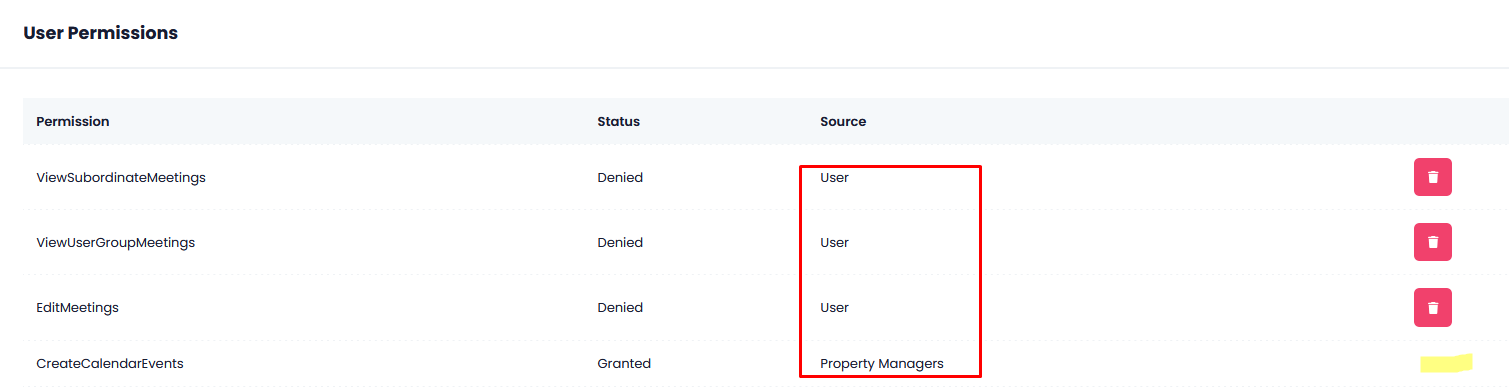
The Source column shows how the permission was assigned: “User” means it was granted directly to the user, while a user group name means it was assigned via that group.
You can fine-tune permissions using a mix of group and user-level settings. Denied always overrides Granted, whether set at the user or group level.
This lets you make exceptions — for example, granting a permission to a group but denying it for one user, or vice versa. It’s a flexible way to manage permissions efficiently while allowing individual adjustments.
There’s no bin icon if the permission was granted or denied via a user group — you’ll need to amend those on the Permissions page.
Editing a Password
- To change a user's password:
- Enter the new password in the Password field.
- Confirm it in the Re-enter Password field.
- Click Save Changes.
User Groups
User groups
make it easier to assign tasks or permissions to multiple users at once.
Select this submenu under Users to create and manage user groups.
Select this submenu under Users to create and manage user groups.
- To create a user group, click the + sign next to User Groups.
- To rename a group, click the blue pencil icon next to its name.
- To add users to a group, select the group, then click the + sign next to [Group Name] Members.
- To view members, click the group's name.
- To delete a group or member, click the bin icon next to it.
Permissions
Select this submenu under Users to manage permissions for users and groups.
Permissions are organised by categories under Categories.
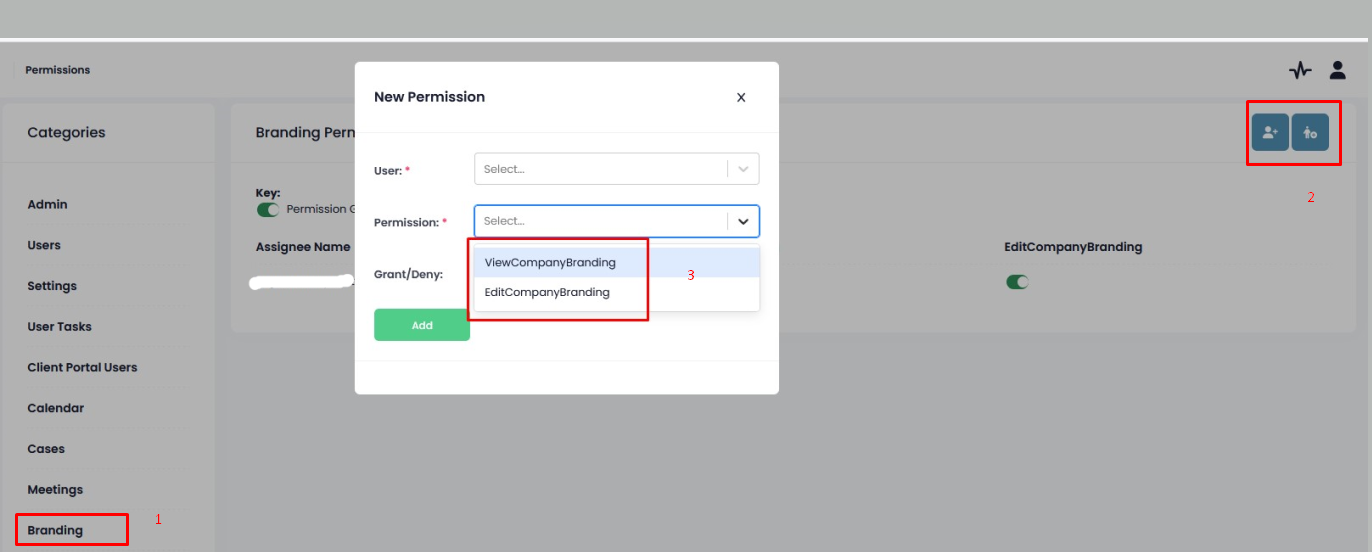
Assigning Permissions to a User
- To assign a permission to a user:
- Click on the name of a category (e.g. Settings).
- Click the first blue button on the right.
- Choose the user's email from the User drop-down.
- Select the appropriate permission.
- Check the Grant/Deny box to activate it immediately or leave it unchecked to enable it later.
- Click Add.
To see which permissions are available in a category with no users yet, select the category, click to add a user or user group, and check the Permission drop-down in the pop-up window:
- After assigning a permission to a user:
- The other permissions in the category will appear for them.
- The selected permission will be colour-coded:
- red for denied (inactive)
- green for granted (active)
- The remaining permissions are greyed out by default.
- To activate them, click the round white button until it shows the desired colour.
Assigning Permissions to a User Group
- To assign permissions to a user group:
- Click the second blue button on the right:
- Chose a group.
- Select the permission.
- Check Grant/Deny to activate immediately.
- Click Add:
- After assigning a permission to a user group:
- The other permissions in the category will appear for them.
- The selected permission will be colour-coded:
- red for denied (inactive)
- green for granted (active)
- The remaining permissions are greyed out by default.
- To activate them, click the round white button until it shows the desired colour.
Permissions assigned to both users and user groups will appear in the relevant permission category:
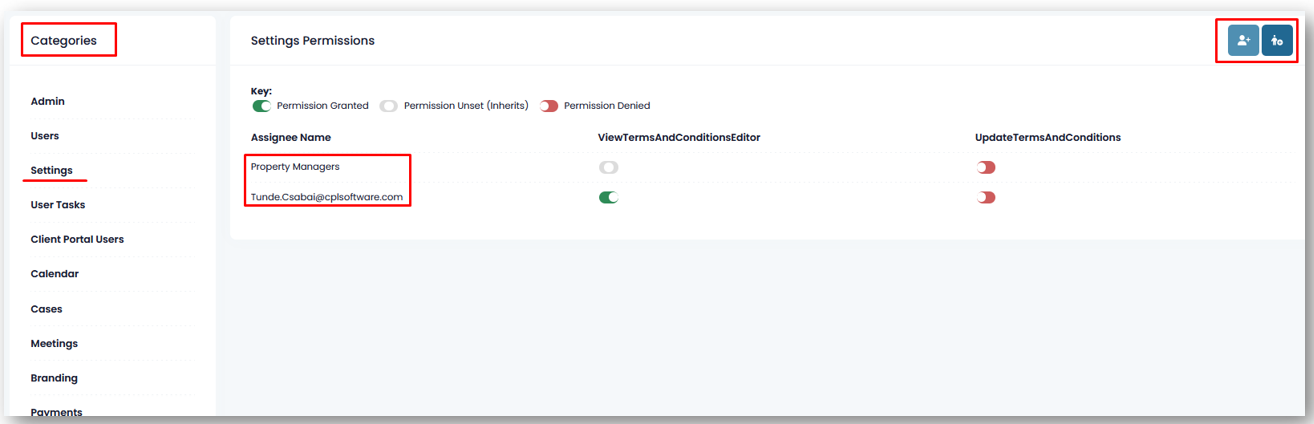
Individual permissions can be managed in the user’s profile or on the Permissions page.
Group permissions can only be changed on the Permissions page. All granted and denied permissions for a user are visible and can be managed in their profile.
Related Articles
Users - Setting Permissions
This article is part of the Users section. Find all related articles here: Users Permissions allow you to restrict or allow users access to different areas of the system. They can be applied to an individual user, or to a user group. You can also ...Users - Creating a New User Account
This article is part of the Users section. Find all related articles here: Users If you’re using the Property Portal, please refer to this article for information on setting up users, rather than this one. Adding a New User Account Follow the below ...Property Portal - Clients: Client Portal Users
This article is part of the Property Portal section. Find all related articles here: Property Portal Once a client has created their Client Portal account, their details — including account status and Terms and Conditions acceptance — can be viewed ...Property Portal - Admin: Client Portal - How It Looks
This article is part of the Property Portal section. Find all related articles here: Connect The New Client Portal can be customised in Property Portal. You can configure the following aspects to match your organisation’s branding and settings: ...System Parameters - Creating User Groups
This article is part of the System Parameters section. Find all related articles here: System Parameters User Groups are used to group together a set of permissions based on a specific job role. These can then be assigned to users to determine what ...